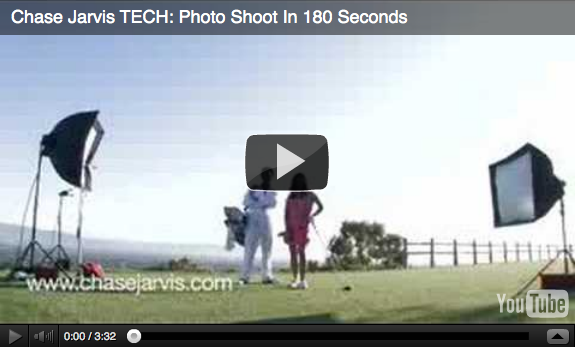
So many of the photography videos out there show great behind-the-scenes footage and tons of gear-related details. This video is more than that. In this Chase Jarvis TECH, I’m responding to the dozens–seemingly hundreds–of emails I’ve received recently asking me to highlight the various steps that comprise a professional commercial photo shoot. Therefore, follow along in this 3 minute video as I walk you through a recent commercial assignment where I was hired to photograph 3 hot young golf ladies of the LPGA.
[And of course I included a lighting diagram and tech specs in the video for you photo geeks out there.]
Click the ‘continue reading’ link below for a more complete description of the shoot, including the 6 core components to almost every commercial gigs, a detailed list of the equipment used, and more.
–
We all like to focus on the creative aspects of our jobs as photographic artists. I know that’s my favorite part – it keeps us sane and engaged. However, often overlooked are the nuts and bolts, or the framework for what enables our professional creative vision to become a reality.
As you see in the vid, it’s my belief that nearly every commercial shoot has 6 core components or phases. Roughly, those are:
1. Contracts, creative concepting, and pre-production. In this phase you’re putting the deliverables in writing, your flexing your creative muscles with the client, and you (or your producer) are lining up the logistical details of the shoot.
2. Travel. While it’s not a component to every shoot (eg, in your studio?), it is a big part of many shoots. Whether you travel across the country, the world, or just your home town, you’re still moving bodies and equipment, and thus this deserves your attention.
3. Scouting. Whether you do it weeks, days, or hours in advance, you should–if at all possible–build time into your schedule to visit the location before you shoot. Take into consideration how the light looks, where the sun moves, logistical challenges, etc. Take sample images and look at various angles. Make a game plan.
4. Shooting. This is the fun part where you get to do all the stuff that made you want to be a photographer in the first place. Focus on creativity and executing your vision.
5. Post production. This is the step where you process your images, retouch them according to the client needs, and most importantly add your personal mojo. This is often overlooked, so be sure to build time into the schedule. (See an earlier post for my opinions on this.)
6 Delivery. Whether you deliver online via FTP or via hard drives, DVDs, or whatever media via Fed Ex, it’s important that you have a smooth system that works for both you and the client, with special attention to file format, color space, and timeline, etc.
Obviously, these 6 components are just a shell meant to act as a guideline. You could thin-slice this to death and include color palette review, stylist collaboration, prepping the models or talent, etc, but I’ve chosen to sort these things into these 6 larger buckets. Of course you could also add things before and after this set of six, like wooing the client before and following-up after the job with a thank you, etc. Again, I’m truncating these elements in favor of focusing on the big 6 elements so that you catch my drift.
Other specs from this job:
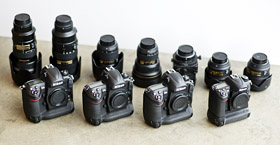
-I shot using the Nikon D3, and
-I shot primarily with the Nikkor 24-70mm 2.8 lens, and
-I shot primarily on a Bogen carbon fiber tripod and a Manfrotto head, and
-I shot tethered to an Apple MacBook Pro (see Pimped Laptop Case vid), and
-I shot directly into Apple Aperture, and
-I used 2 Profoto 7b packs, and
-I used Pocket Wizards to fire the strobes, and
-I used one medium and one small Chimera softbox.
The great LPGA golfers I was fortunate to shoot for this gig were:
-Erica Blasberg
-Charlotte Mayorkas
-Irene Cho
And, as always, feel free to post comments, ask questions, or lemme know what I forgot to include in the comments below.
Other Chase Jarvis TECH videos that might float your boat:
[Chase Jarvis TECH: Packing Photography Gear]
[Chase Jarvis TECH: POV Photography]
[Chase Jarvis TECH: Pimped Laptop Case]
For RSS readers…depeding on your reader, you may need to click here to see the video.
Related posts:
---
Get my every move: Follow Chase Jarvis on Twitter
Get exclusive content: Become a Fan on Facebook


Another question:
Someone told me i cannot really calibrate a macbookpro screen?!?! is that right or wrong?!?
marc,
It’s not really so much that you can’t profile a mac book screen, it’s just that it’s not as effective as profiling a desktop screen. There are many things that effect the profile, temperature, refresh rate, etc. Those things change much more frequently on the laptop. That being said, I’d still profile it every once in a while, just to keep a slightly more accurate baseline.
-Dartanyon
So what you actually doing when you shooting on a job is just checking the lightsetups and all the postproduction you do on a desktop computer with a calibrated screen. thats my prob at the moment that the colors just change in web and seeing it on camera and after print. I figured out that srgb is used in the internet so i safe my pictures ‘for web’ if i wanna upload them but the next step is that when i print out pictures it s all messed up again. when cahse is shooting with his nikon which color profile do u guys use?!? adobeRGB??? Or do you guys ahve any recommendation for a book i can get myself some more knowledge about that whole colorprofile thing! I wanna learn that… and know what I am doing when i play in the settings! And which screen calibrator would be the best?!?
thx alot for the fast reply
really appreciate
Marc,
Shooting tethered to Aperture on location is done with the laptop for the purpose of checking exposure, focus, and discussing/editing with the client. All of the final post production is done on a calibrated display at the studio, hotel, etc. We work with images in the Adobe RGB 1998 color space, this is the industry standard for wide gamut color.
When creating files for the web, generate new files from your originals and change the color space to sRGB. That way your original stays in the best color space, and you will be able to make nice prints. Check out the book “Real World Color Management” by Bruce Fraser for more color knowledge than you ever thought possible. Enjoy!
This is the knda thing I love to see.. the shots look amazing at the end bro ! J
When shooting tethered to Aperture, is there any way to automatically apply adjustments to the images as they come in?
Seems there are many instances where software is used to create specialized looks and it’s so much easier when they pop up on screen looking very close to the target in terms of color, saturation, curve, etc.. Sometimes it’s hard to explain to clients “Well it will look like *this* later. This initial image is just for checking focus, etc..”
Maybe I’ve just missed how to apply settings to incoming tethered images in Aperture, so if you could pass along any tips, that would be much appreciated! THANKS for such a well done, informative blog!!
@Anon: I haven’t found a way to automatically adjust files coming into Aperture while tethered shooting. We generally use the Adjustments HUD to create a specialized look, and the Lift and Stamp tools in order to apply preset adjustments to images as soon as they are imported via the tether. This way, you can quickly drop prescribed adjustments on to any picture(s) you’d like to share with the client. Hope this helps.
Hey Scott — Do you guys make many adjustments in Aperture? I have the latest version, but it still chokes when I have several adjustments along with cropping or straightening. I’m thinking a better video card may be need, even though it’s a Mac Pro. What card do you guys use?
@Mike: We do make a lot of adjustments in Aperture. We use if for everything from initial RAW adjustments, to final file prep, web galleries, books, etc. My computer has the ATI Radeon HD 2600 video card, and the program runs smoothly for the most part. Hope this helps.
Very nice video!
What did you do in photoshop / aperture to make that nice look on your final pictures? The panorama was incredible!
Chase, awesome stuff!! Any chance you can list what you used for your lighting set-up? I know you mentioned the ProFoto packs and camera, but what type of softboxes, etc etc. Or anyone else that has an idea. Thanks so much
Reassured by your faith in Aperture (.2 presumably). I tried Aperture and Lightroom demos after deciding to move on from C1Pro but at first missed the certainty of the white balance and white and black point settings using a white/black/grey strip in the shots. Only really settled for Aperture since we run Macs. Always shoot raw and raw conversion does seem to be really good.I still set the white balance off a grey card in the studio, of course. Have to say your openness is a tonic – you make photography exciting again in a world full of ‘teachers’ charging a fortune for pretty dubious info! Many thanks.
Well I'm about a yr and a half late on this (lol), but thanks for posting this. It was pretty cool.